Pages

Saturday, December 15, 2012

How to Create a Blog Title Moves

  1. As usual login id Blogger pal. 
  2. Click the Design tab (Design)> Edit HTML. 
  3. Find <data:blog.pageTitle/> <title> code </ title> 
  4. Then replace the code with the following code  
 <script language="JavaScript"><br />var txt="<data:blog.pagetitle/>";<br />var kecepatan=100;var segarkan=null;function bergerak() { document.title=txt;<br />txt=txt.substring(1,txt.length)+txt.charAt(0);<br />segarkan=setTimeout("bergerak()",kecepatan);}bergerak();</script>

Note: the number 100 indicates the speed, can change as our friend. The bigger means slower and vice versa.
   5. Save and see the results.

How to Create Link Tab Labels on Blogger


No one yet knows how to make a tab above?? thinkAt first I thought it is hard to learn html,,Apparently not as difficult as I think you know,,This time my mw ngeShare way for the Tab label link Blogger,,Let's let a big smile
The way is easy,,
First open design and add widgets such as HTML / JavaScript,,
Then enter the following script:


    <div style="text-align: center;">
    <div id="navigation">
    <ul>
    <li class="selected">
    <a href="http://NAMABLOGANDA.blogspot.com/"> Home </ a> </ li>
    <li> <a href="http://NAMABLOGANDA.blogspot.com/search/label/NAMALABELANDA> NAMALABELANDA </ a> </ li>
    </ Ul>
    </ Div>
    </ Div>
You can add a link tab to copy and paste the following script:
    <li> <a href="http://NAMABLOGANDA.blogspot.com/search/label/NAMALABELANDA> NAMALABELANDA </ a> </ li>

under the table script before,,

    <div style="text-align: center;">
    <div id="navigation">
    <ul>
    <li class="selected">
    <a href="http://NAMABLOGANDA.blogspot.com/"> Home </ a> </ li>
    <li> <a href="http://NAMABLOGANDA.blogspot.com/search/label/NAMALABELANDA> NAMALABELANDA </ a> </ li>
            Copy >>> here <<<<
    </ Ul>
    </ Div>
    </ Div>


Here is a script Link Tab on my Blogger, making it so that as it is now blushing

    <div style="text-align: center;">
    <div id="navigation">
    <ul>
    <li class="selected">
    <a href="http://regaliaprima.blogspot.com/"> Home </ a> </ li>
    <li> <a href="http://regaliaprima.blogspot.com/search/label/Info"> Info </ a> </ li>
    <li> <a href="http://regaliaprima.blogspot.com/search/label/News"> News </ a> </ li>
    <li> <a href="http://regaliaprima.blogspot.com/search/label/Pak Koki"> Pak chef </ a> </ li>
    <li> <a href="http://regaliaprima.blogspot.com/search/label/online"> Online </ a> </ li>
    <li> <a href="http://regaliaprima.blogspot.com/search/label/Download"> Download </ a> </ li>
    <li> <a href="http://regaliaprima.blogspot.com/p/ptc-corner.html"> PTC Corner </ a> </ li>
    <li> <a href="http://regaliaprima.blogspot.com/p/about-me_26.html"> About Me </ a> </ li>
    </ Ul>
    </ Div>
    </ Div>

How already obvious right? greatStay comments aja ya if there is a clear nda hehe,,You're reading an article about How to Create Link Tab Labels on Blogger and you can find articles on How To Make Tab Blogger Label Link with url http://regaliaprima.blogspot.com/2010/11/cara-membuat-link-pada-tab -blogger.html, luaskannya you may spread or copy and paste it if the article How to Create Link Tab Labels in Blogger is very beneficial to your friends, but do not forget to put a link How to Create Link Tab Labels on Blogger as a source.

How to Create Labels in Blog

How to Create Labels in Blog is a basic tutorial in blogger, but it is important for the future development of the blog. If described by its interests as well as a book, which has the title, table of contents and table of contents are sub distinguish between discussion with each other. If it is in a book does not have it, then the sub-category list will mingle, profanity and erratic.Likewise with a website / blog, which can be compared only with the book, if it does not have a label will blog profanity uncertain. Besides, the label can be classified in a blog to your liking, such as health label, you have to adjust the post with a label that will want you to enter. If you post about the dangers of smoking ideally you should put into the health label.Creating a blog label is not difficult, you just pay attention to the steps which I will explain below, while practicing into your blog.
  1.   Sig in to your blogger account
  2. Click the Layout menu 
  3.  Click Page Elements menu 
  4.  Click on Add a Page Element
  5. Click the button that says add to your blog posts under Labels
    Labels writing in addition to writing title can mate change to class if my friend wanted to change
    
Select the radio button next to buddy want Sorting, alphabetically: if you want to show categories according to alphabetical alphabetically (from A -> Z) By frequency: if the category you want to appear in accordance with the number of labels (categories)
    
Click the button that says save changes
    
Completed.See the picture below:create a blog labels, label blog, blog how to create labels, label, blogSo how to create a label on the blog, hopefully useful, see you at the meeting and how to make your next blog. Make sure you visit the blog Super-Bee mendaatknupdate information about tutorials for bloggers and other information.

Step2 How to Install Windows 7 (Complete with pictures)


For those who have never installed windows 7 to a computer or laptop. here's how to install windows 7 complete with a picture of the drawing. Step2 is either by using media such as DVDs or other media using flash is the same, whether it is for a 32bit version and a 64bit version, for those who do not have installation windows7 please see the flash media to install Windows 7 using a flash here.

Let's get started!.

Insert the DVD or plug in the pendrive windows 7 windows 7 us, and then the boot is put on the media that we have chosen, and the process of loading the file will start.


Select your language, time and currency format, keyboard or input method and click Next.


Klik Install now


Conteng I accept the license terms dan klik Next.


Click the upgrade if you already have a previous version of Windows or Custom (advanced) if you do not have a previous version of Windows or want to install a new copy of Windows 7.


(Skip this step if you choose Upgrade and have only one partition) Select the drive where you want to install Windows 7 and click Next. If you want to create a partition, click the Drive options (advanced) to create partitions and then click Next.

Now it will start installing Windows 7. The first step, (ie Windows starts copying files) is done when you boot the DVD / fd Windows 7 that will be completed instantly.


After completing the first step, it will expand (decompress) files that have been copied.


After that it will automatically restart after 15 seconds and continue setup. You can also click on Restart now to restart without the need to wait.


Tuesday, December 11, 2012

Windows 8 recovery options


Super important: For up to date instructions on how to disable Metro, the new
Modern UI Start menu in Windows 8, please take a look at this tutorial! Must see!
I have decided to be a news fanboy and start writing articles about new features implemented in the upcoming Windows 8. Pretty much everyone is doing it, so you may see a bit of regurgitated tech lingo here and there, although I will try to be both funny and original, while maintaining utter professionalism and keeping you informed. What more, I am sort of a Linux guy, which makes the me the best person to give you an objective report on the state of the new Windows.
Seriously, there are lots of interesting things coming in Windows 8 that we should talk about. Some are definitely overplayed, like the security, most of which you have already seen in my Windows 7 articles, one and two, but we might have another sequel. Then, there's the supposedly improved boot process, but that's for later. A new filesystem? Yes, please. Personalization, safe mode? Sure, we will discuss those, too. Today, we will focus on the new refresh/reset feature.
Teaser

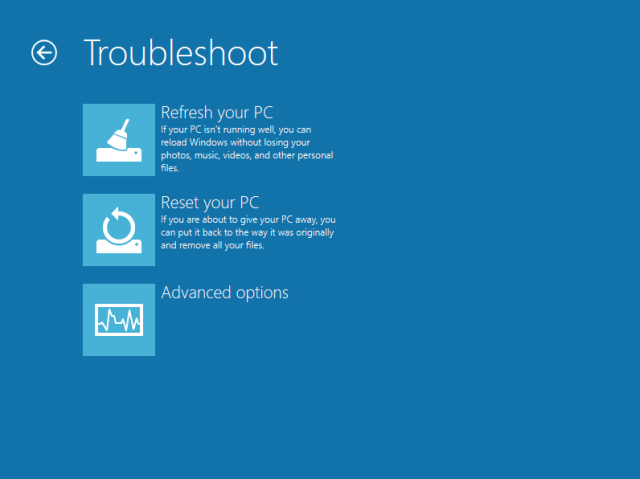
What is the refresh/reset?

The choice of words might be a bit tricky, but essentially, Microsoft want to make life easier for average users by giving them an option that OEM have been doing for years with Windows-based laptops - an ability to reset the system to factory settings, so to speak.
More advanced users will probably not be using the built-in system recovery mechanisms, as imaging sounds like a more flexible, more useful option. But then, even they might get lazy and choose the new stuff.
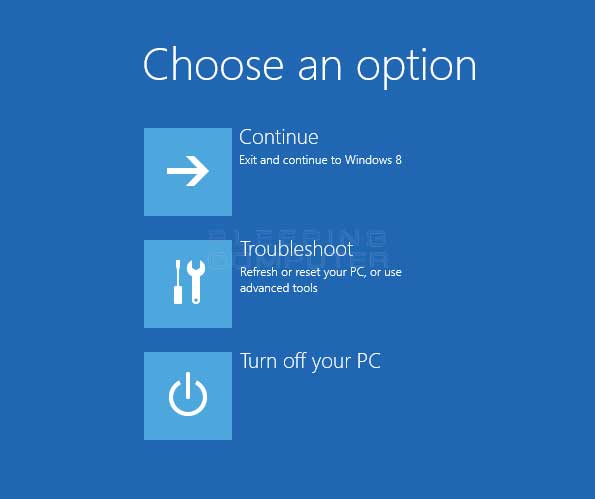
The two functions are available under Recovery in the Control Panel, using either the new interface or the old interface. However, you can only run them from within Windows if you have the Metro interface enabled, so please be aware of that. Now, this is nothing sinister, because you can toggle Metro on and off with a single registry key change and one login, no reboot required. Alternatively, you will need to fire up the recovery console during the boot and invoke the necessary functionality. You can also pop in the installation DVD and repair your system. The options are many and varied.
So let's open that menu. Let me show you both the new and classic Control Panel:
Via new control panel
Recovery options, classic panel

Refresh

Refresh is similar to booting into safe mode and trying to repair your Windows, using the sfc command on Windows XP, inserting your CD and then letting Windows fix corrupted system files by copying from the disc, or by using the recovery console in Windows 7, which then accesses the 100MB hidden partition where core system files are saved for emergency. Refresh is all of these combined.
It will let you reload core system files from its backup. Personal data will not be touched, although there is no guarantee that the repair process will work. So you are advised to keep your stuff on a separate partition and have a sound backup procedure in place. Imaging your system is also a wise choice, especially since you have a plenty of useful tools available, all for free. Lots of links on imaging further below.
You will lose programs installed manually. All your settings and tweaks will also be restored to default. So please think twice before you permanently refresh your system.
Refresh
Zoomed

Reset

Reset is a more stringent operation. It is designed to truly reset your system to factory defaults, which, in this case, might be either a preinstalled setup or your own manual installation. Either way, you will lose all of your data and the system will go back to its pristine, fresh state.
This kind of operation might be desirable if you plan on giving away your machine with Windows installed, but you fear there might be traces and leftovers of personal data stored somewhere. Now, technically speaking, your data will still be there on the disk, only not accessible by the regular means of browsing using the Windows Explorer. So if you are keen on privacy, then you might want to consider a low-level format. We will have a separate discussion on this one soon.
Reset
Zoomed

What to choose? And when?

Now, the tough decision. Normally, if you are practicing safe and sane computing and do not abuse your system, you will probably never need to execute the Refresh option. In fact, you won't need ever fight BSOD, boot into safe mode, use the recovery console one way or another, or even invoke the system restore. All this assuming you behave.
If bad things happen, restoring your machine to a state that might have existed two years back or so could be painful. And the time you will need to get all your programs back might be equal to starting fresh and reinstalling from scratch. So you might be better of with system imaging, executed periodically before big changes.
The Reset sounds more useful, because it is more final. This is the kind of thing you will do when you no longer expect to continue running your system, so there should be fewer doubts about what might happen. Just remember that physical data might remain stored on the disk.

In action

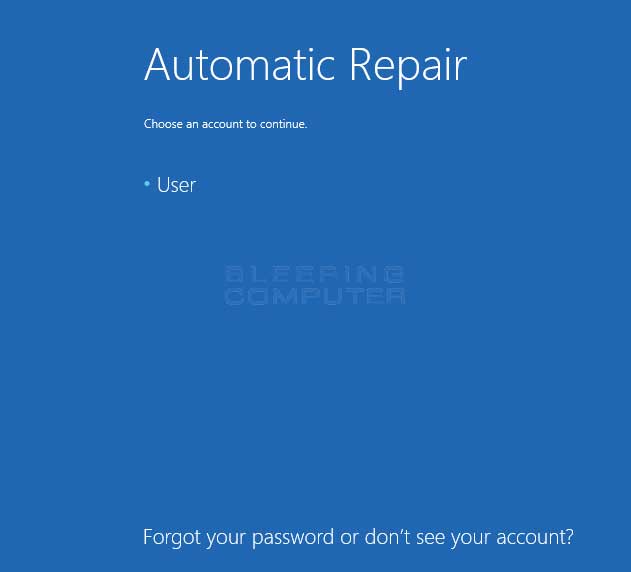
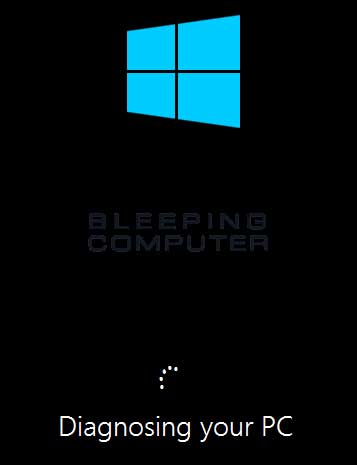
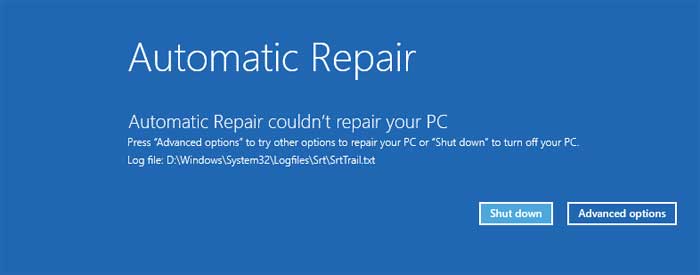
Does this really work? Well, let's see. In my case, I deliberately borked a virtual machine, messing up the display by using incompatible 3D features in VirtualBox, which caused my test image to stop being usable. Then, I loaded the recovery console and started playing.
You will notice the new style and colors used. In all previous versions, Windows used a more classic recovery console. Here, it's inline with the new theme. The two dominant options are Refresh and Reset, but you can also do all the other things.
Begin troubleshooting
Since our system is no longer functioning, but we still supposedly need our data, we will try refreshing the host. This means we ought to go back to default system settings, with our personal stuff still intact. Windows Store apps will be kept, which is a nice thing.
What will happen
Your next step is to choose the target, if you have more than one instance of the Windows operating system capable of being refreshed installed on your disk. In most cases, for the vast majority of users, there will be only on target, Windows 8 or higher.
Target
Next, Windows 8 will prepare itself for the purging process. Do note the somewhat confusing message about being plugged in. This refers to the power source, if you're running on a laptop. In general, whenever you're doing any system maintenance on any operating system, you should not work on the battery power.
Working
Ready
And then, the actual refresh will begin. This can take a while.
Refreshing
After the Refresh process was complete, the system came up just fine. Indeed, it was restored to its original state, with all and any trace of my shenanigans gone. The feature seems to be robust and it's quite easy to use. There you go.

More reading

As promised, some links to imaging software:

Other super useful tutorials

Windows 7/8 dual-boot guide, with Ubuntu side-by-side
Windows 8 without Modern UI Start menu interface

Conclusion

For casual users who will rarely if ever practice any of the smart habits of multiple data backups and periodic system checkpoints with imaging software, Refresh and Reset sound like a blessing. Extremely straightforward and easy to use. Lovely jubbly.
There might be faster and more elegant alternatives out there, but for the vast majority of people, having a built in toggle from bad to good is a great thing and possibly the most interesting feature in the new release yet. It does not promise wonders and miracles, but it does guarantee system integrity, allowing you to remain up and running.
Well, that would be all for now. Take care.

How to automatically repair Windows 8 using Automatic Repair


Windows 8 includes a recovery feature called Automatic Repair that attempts to automatically diagnose and fix common issues that may cause Windows 8 to not start properly.  Automatic Repair will start automatically when Windows is unable to start properly. Once started, it will scan various settings, configuration options, and system files for corrupt files and settings.  If it detects anything, it will automatically attempt to fix them for you.
To access Automatic Repair in the Windows Recovery Environment you need to go to the Windows 8 Start Screen and type Advanced. When the search results appear click on the Settings category as shown below.

Advanced start screen search

Now click on the option labeled Advanced startup options and you will be brought to the General PC Settings screen. Scroll down to the bottom until you see an option labeled Advanced startup. Click on the Restart now button and Windows 8 will restart your computer and go directly into the Advanced Startup options menu.

Advanced startup options menu

Now click on the Troubleshoot button and then the Advanced options button. When the advanced options screen opens, click on the Automatic Repairoption. Your computer will now reboot and you will then be shown a screen where Windows states it is preparing Automatic Repair. When it is done, you will be shown a screen where you need to select an Administrator account that you wish to login with.

Select an administrator account

Please click on the account you wish to use. If your account has a password on it, you will be required to enter it and then click on the Continue button to continue with the automatic repair. Automatic will now start and attempt to diagnose the problem with your computer.

Automatic Repair diagnosing the computer

The automatic repair process can take a quite a while, so please be patient while Automatic Repair attempts to find a repair startup problems in Windows 8. During this process your computer may reboot. This is perfectly normal and nothing to worry about. Once the automatic repair process has completed it will tell if you if it was able to repair anything. If it was not able to repair anything you will be shown a prompt asking if you wish to shutdown or use some other tools.

Automatic repair could not fix the problem

At this point, if your computer is still unable to start up, you should you click on the Advanced options button, followed by Troubleshoot, and finallyAdvanced options. On this screen you can select other tools to use to diagnose your problem. For a failed automatic repair, the best step to try next is to use System Restore, which has a guide listed below.
Each tool in the Advanced options screen is described in the following guides:
You can use one of the above tools to try and restore your computer to a usable state.
High Volume Forex Trading  cTrader ECN for high volume trading Start with spreads from 0 pips! 

How to Fix Windows 8’s Biggest Annoyances (and Make It More Like Windows 7)


Windows 8 has some awesome new features, but it also has its fair share of annoyances. Here's how to fix all of those problems, from bringing back missing features like the Start menu to fixing new problems like a dumbed-down Windows Explorer.
Look, we like Windows 8. It has some really cool stuff going for it, and most of the complaints surrounding it are misguided. However, there are a few annoyances that really need fixing. Instead of sticking with Windows 7 and missing out on Windows 8's improvements, we're going to show you how to get the best of both worlds.

Bring Back the Start Menu

The new Start screen isn't all that bad, but if you want the comfort of your old Start menu, it's really easy to bring backStart8 is our favorite Start menu replacement, bringing a customizable start menu that fits in really well with Windows 8's new features and aesthetic. It's $5, but it's well worth the price and insanely easy to set up.
Alternatively, you can use the free Classic Shellreplacement, which is a tad more complicated but also more configurable than Start8. You have a lot more control over what your Start menu looks like, and can even tweak how the Search box works. When you install, you'll have the choice of installing just the Start menu or installing add-ons for Windows Explorer, Internet Explorer, and other programs too (more about this in a bit).

Get Rid of the Start Screen, Hot Corners, and More

How to Fix Windows 8's Biggest Annoyances (and Make It More Like Windows 7)If you really, really, really hate the tiled interface, you can get rid of it entirely with the aforementioned Classic Shell. Right-click on your Start menu and head into the settings. Under the "Windows 8 Settings" tab, you can check a box to skip the Start screen at login, as well as disable the hot corners if they trip you up. Start8 will also let you bypass the start screen, though it can't disable anything else.
If you're using Start8 instead of Classic Shell but want to disable the other "Metro" features, you can do so with a $5 program called RetroUI. It's simple: you can choose to bypass the Windows 8 Start screen after login, bypass the Start screen after locking your computer, or go all-out and get rid of everything: the Start screen, the Charms bar, and hot corners. Make sure you install Start8 first, or you'll have a lot of trouble opening programs and shutting down your computer since you won't have any of those functions available.
You can also disable the lock screen using Group Policy editor, if you so desire.

Customize the Ribbon-ified Windows Explorer

The new Windows Explorer has some cool features, but not everyone's a fan of the Ribbon interface. If that sounds like you, you have a few options for improving Explorer.
Classic Shell adds a new toolbar to Windows Explorer with small, simple buttons that you can customize to your heart's content. It isn't quite the same as having the old dropdown menus, but it's much simpler than the new Ribbon interface, and lets you add only the functions you'll actually use, which is nice. If you don't see it after installing Classic Shell, head to View > Options, click the Classic Explorer Bar to enable it, then click the seashell icon in the new toolbar to customize it.
However, if you prefer a more traditional file explorer with dropdown menus, you're better off with a full Explorer replacement like Xplorer2. Not only will it give you all your advanced menus back, but you'll get tabs, two-pane browsing, tons of keyboard shortcuts, and a fantastic search feature. It won't be quite as pretty as the new Windows Explorer, but if you long for traditional menus rather than the new Ribbon, this is your best bet.

Play DVDs for Free

How to Fix Windows 8's Biggest Annoyances (and Make It More Like Windows 7)Bad news, movie buffs: DVD playback is gone in Windows 8. Even if you download the currently-free Windows Media Center, it'll only allow you to play DVDs in Media Center—not in regular desktop programs like Windows Media Player.
If you want to play DVDs in Windows Media Player, it directs you to the Windows Store where you can buy an add-on for DVD support. Unless you really want to use WMP, don't waste your money—a program like VLC will play DVDs for free. Download it, install it, and forget about paying for DVD playback.

Bring Back the Confirmation Box When Deleting Files

In Windows 8, when you delete a file, it no longer asks you whether you're sure—it just sends the file right to the Recycle Bin. This was an option in Windows 7 as well, but it wasn't the default—and if you'd rather have that extra safety net, you can easily bring the confirmation dialog back. Just right-click on the Recycle Bin, choose Properties, and check the "Display Delete Confirmation Dialog" box.

Show the Desktop with a Hidden Button

How to Fix Windows 8's Biggest Annoyances (and Make It More Like Windows 7)Remember Aero Peek, the feature that let you hover over the edge of the taskbar to show your desktop? That's still around in Windows 8, but you have to enable it first. Right-click on the taskbar, choose Properties, and under the Taskbar tab check "Use Peek to Preview the Desktop." You won't see the button at the right edge of the taskbar like you did in Windows 7, but it's there—just hover your mouse over the area right of the clock and your windows will turn invisible again. You can also click this area to show the desktop instead of just peeking at it.

Replace Flip3D so You Can See Your Open Windows

Flip3D is also gone in Windows 8, but let's be honest: it wasn't that good to begin with. It was a nice piece of eye candy, but it wasn't exactly the most efficient way to see your open windows. There isn't a true replacement for Flip3D, but you can download a few programs that serve a similar purpose. Previously mentioned SmartFlip puts your windows in a wheel, letting you flip through them with whatever hotkey you want. Alternatively, you can download something like Switcher, which is more like OS X's Exposé, spreading your windows out into a grid when you press the desired hotkey. They won't bring back the eye candy of Flip3D, but they will serve the same purpose, and probably do it better.